

Commercial Kitchen Hood Installation Made Easy (Even If You're Not Handy)
Why Commercial Kitchen Hood Installation is Critical for Restaurant Safety

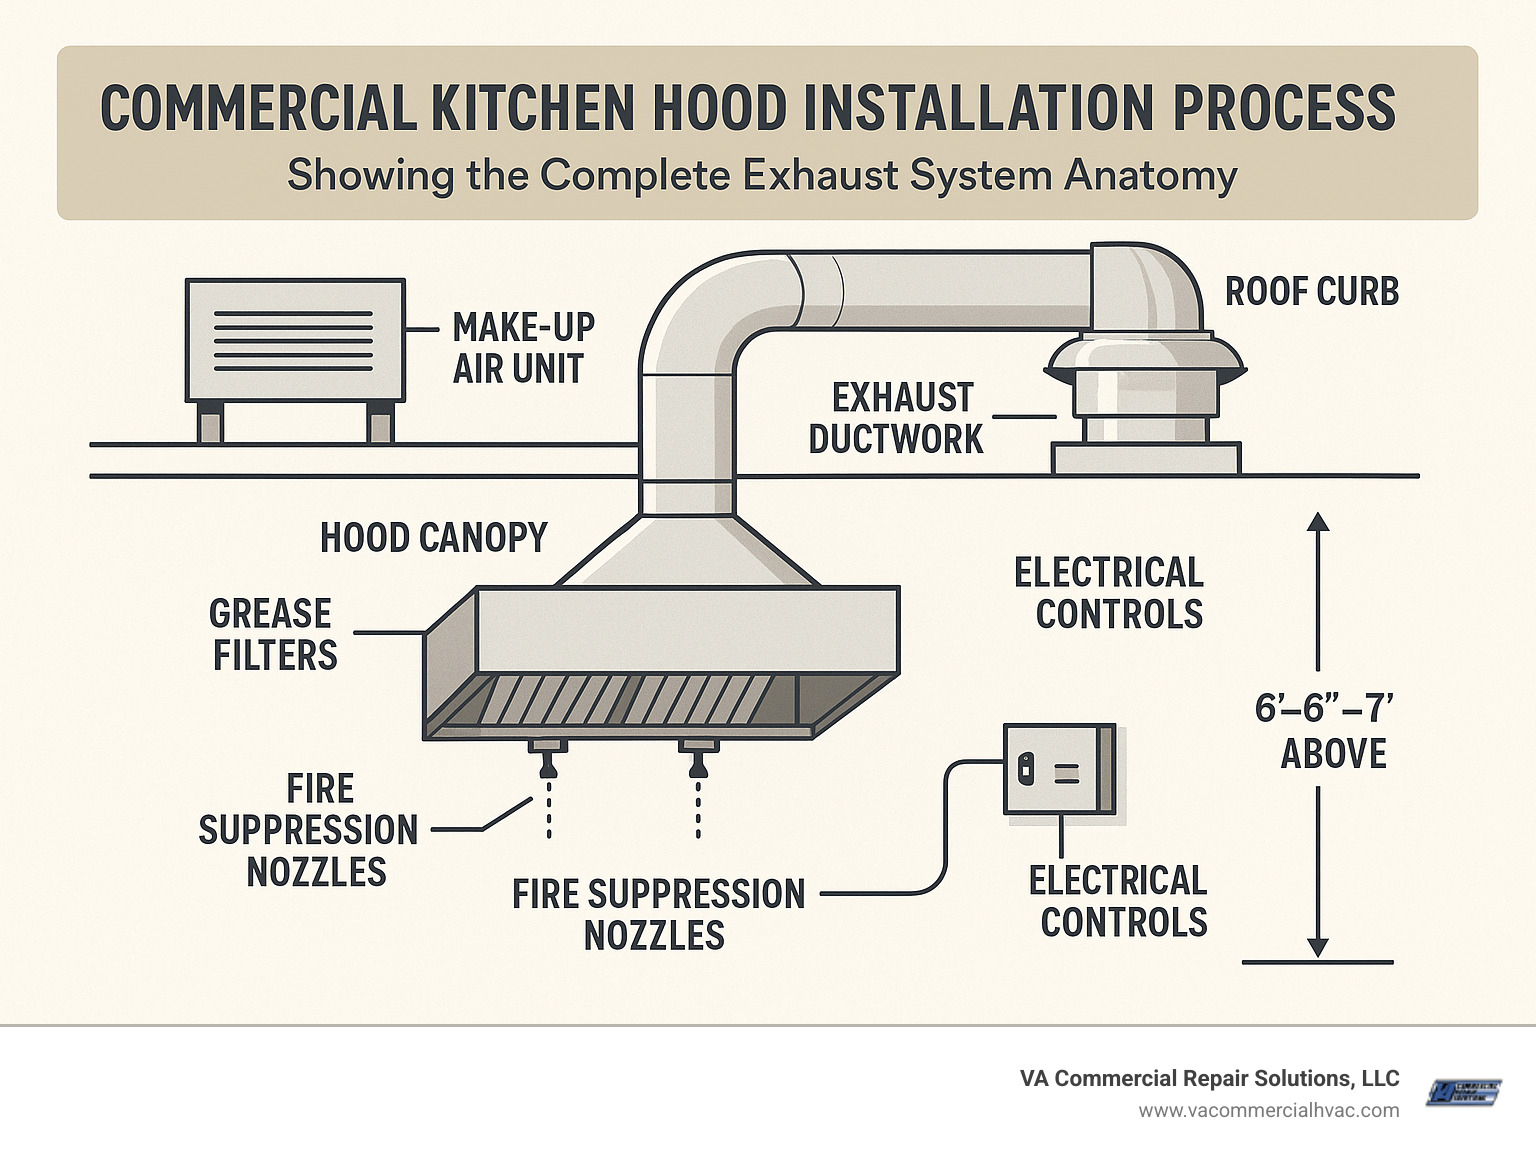
How to install a commercial kitchen exhaust hood requires careful planning, code compliance, and professional expertise to ensure your kitchen operates safely and efficiently. Here's the essential process:
- Obtain permits and review NFPA 96 requirements
- Calculate airflow needs (exhaust CFM and make-up air)
- Prepare the site with proper clearances (18" from combustibles)
- Install hanging hardware using 1/2" threaded rods
- Mount and level the hood at 6'6"-7' above floor
- Connect ductwork with continuous liquid-tight welds
- Wire controls and lighting with high-temperature materials
- Integrate fire suppression system per UL 300 standards
- Test performance with smoke capture evaluation
- Schedule final inspection with local authorities
Commercial kitchens generate massive amounts of grease-laden vapors, smoke, and heat that must be safely removed to protect your staff and customers. Without proper ventilation, you're looking at fire hazards, failed health inspections, and uncomfortable working conditions.
The installation process involves complex code requirements, structural considerations, and specialized welding that go far beyond typical residential work. Professional installation costs between $4,000-$5,000 per linear foot, but the investment protects your business from costly violations and potential disasters.
As Gregg Kell from VA Commercial Repair Solutions , I've guided countless Central Virginia restaurants through commercial kitchen hood installations, ensuring they meet NFPA 96 standards while minimizing downtime. My experience has taught me that proper planning and professional execution are non-negotiable for long-term success.
Related content about how to install a commercial kitchen exhaust hood : - commercial kitchen hood installation cost- commercial kitchen hood installers- commercial kitchen hood installers near me
Codes & Compliance: The Rules You Can't Ignore
When it comes to how to install a commercial kitchen exhaust hood , the paperwork comes before the power tools. I've watched too many restaurant owners get blindsided by code requirements that could have been handled upfront with proper planning.
NFPA 96 is the foundation—the Standard for Ventilation Control and Fire Protection of Commercial Cooking Operations. Chapter 4§4.1.1 makes it clear: if your equipment produces smoke or grease, it needs a compliant exhaust system.
The International Mechanical Code (IMC) sets minimum safety requirements. The most important rule? That 18-inch clearance between your hood, ductwork, and any combustible materials . Miss this requirement, and your inspector will shut you down.
You can achieve zero-clearance installations with proper insulation assemblies certified by ETL. But this requires specific materials and professional installation.
Your hood needs a UL 710 listing to pass fire safety standards. This certification proves your equipment can handle extreme cooking conditions. Non-listed equipment leads to expensive do-overs when inspectors reject the installation.
Type I hoods handle grease-producing equipment like fryers, grills, and ranges. They require grease removal devices listed to UL 1046 standards. Type II hoods manage steam, heat, and odors from dishwashers and steamers without needing grease management systems.
Your local Authority Having Jurisdiction (AHJ) —usually the building department or fire marshal—has the final word on your installation. I always recommend meeting with your AHJ during the planning phase. It's much easier to adjust drawings than to rebuild installed systems.
The permit timeline typically runs 2-4 weeks, but complex installations can take longer. Factor this into your construction schedule.
Scientific research on NFPA 96 provides comprehensive guidance on ventilation control and fire protection requirements. More info about our commercial kitchen hood installation services includes specific guidance for navigating permits in Central Virginia.
The Paper Trail You'll Need
Before any wrench turns, you need your documentation in order. This paperwork isn't bureaucratic busy work—it's your roadmap to a successful installation.
Mechanical drawings prepared by a licensed engineer typically cost $4,000-$5,000, but they're essential for permit approval. These drawings show exact hood placement, ductwork routing, structural support details, and clearance measurements.
UL 300 fire suppression system plans require separate engineering and must integrate perfectly with your hood design. The suppression system coverage pattern determines which equipment shuts down during activation.
Inspection reports document every phase of your installation. Keep detailed records of every inspection, cleaning, and maintenance activity. This documentation protects your business investment and ensures warranty coverage.
The key is starting this process early. Waiting until the last minute creates unnecessary stress and potential delays that can push back your opening date.
Pre-Install Checklist: Site Prep, Layout & Clearances

Here's the truth about how to install a commercial kitchen exhaust hood : the installation itself is only half the battle. The real work happens before you even touch a wrench. I've watched too many contractors rush into installations without proper site prep, only to find structural problems or code violations that shut down the entire project.
Your hood sizing needs to be spot-on from day one. The hood should extend at least 6 inches beyond your cooking equipment on all open sides. When working with a 10-foot cooking line, I typically recommend a 12-foot hood to ensure we capture all grease-laden vapors.
Installation height is critical. Mount your hood so the bottom edge sits 6'6" to 7'0" above the finished floor . This gives you effective capture without creating a head-banging hazard. Too low, and your tall cooks will hate you. Too high, and you're wasting energy trying to capture vapors that have already escaped.
The 18-inch clearance rule from combustible materials isn't negotiable—unless you're using approved methods to reduce it. We often install one-inch thick listed insulation or special backsplash assemblies that let us achieve zero-inch clearance. These materials must carry proper ETL certification, and the installation has to be perfect.
Floor protection might seem minor, but a damaged kitchen floor can cost thousands to repair. We always cover work areas with protective sheeting and map out clear pathways for moving equipment.
Structural blocking is where the engineering matters. Each hanging point needs to support approximately 500 pounds. We reinforce ceiling joists or add structural support wherever needed—it's much cheaper than dealing with a collapsed hood later.
Your roof curb location determines how complex the ductwork installation becomes. Position it directly above the exhaust connection when possible. Every foot of horizontal ductwork adds cost, complexity, and static pressure.
Negative pressure should target 0 to -0.02 inches water column relative to your dining areas. This prevents smoke from rolling out into the restaurant while keeping the kitchen comfortable.
| Feature | Type I Hood | Type II Hood |
|---|---|---|
| Purpose | Grease-producing equipment | Steam, heat, odor only |
| Grease Filters | UL 1046 listed required | Not required |
| Fire Suppression | UL 300 system mandatory | Usually not required |
| Ductwork Material | 16-gauge steel minimum | 18-gauge acceptable |
| Clearances | 18" to combustibles | Standard building code |
| Maintenance | Daily filter cleaning | Periodic cleaning |
Calculate Your Airflow Before You Drill
Exhaust CFM calculations determine your energy costs for the life of the system. Start by measuring your hood's free area and multiply by the target velocity. For grease hoods, maintain exhaust velocities between 500-2,200 FPM through the filters. A typical 10-foot Type I hood requires 1,200-1,500 CFM.
Make-up air balance is where many installations go wrong. Size your make-up air at 80-90% of exhaust CFM to maintain that slight negative pressure. Never exceed your exhaust CFM with make-up air, or you'll push grease and smoke into the dining room.
Velocity targets matter more than you might think. Supply air should never exceed 400 FPM, or you'll disrupt cooking processes. Exhaust riser velocities between 500-2,200 FPM ensure adequate transport without wasting energy.
How to Install a Commercial Kitchen Exhaust Hood: Step-by-Step
Now we get to the heart of how to install a commercial kitchen exhaust hood —the actual installation process. After 15 years in the commercial HVAC business, I can tell you that this isn't a job for weekend warriors. One small mistake can lead to failed inspections, safety hazards, or worse.
The foundation of any successful hood installation starts with your threaded rod hanging system . We always use 1/2-inch all-thread rod because anything smaller just won't handle the load safely. Each rod needs to penetrate structural members by at least 3 inches, and trust me, you don't want to skimp here. I've seen hoods come crashing down because someone thought 3/8-inch rod would be "good enough."
Hanging angles are your next critical component. These distribute the hood's weight evenly across all mounting points. Most manufacturers provide either four 8-inch mounting angles or two full-length angles, depending on your hood size. The key is perfect alignment with your threaded rods—even a small misalignment creates stress points that can cause failure down the road.
Here's where things get serious: continuous welds on all grease ductwork. NFPA 96 doesn't mess around with this requirement. Every joint must have continuous external welds using 16-gauge carbon steel or 18-gauge stainless steel. No mechanical fasteners allowed in grease duct systems. I've seen too many fires start from grease accumulation at poorly sealed joints.
Silicone sealant fills the gaps that welds can't reach. Use high-temperature silicone rated for commercial kitchen environments—the cheap stuff from the hardware store won't cut it. Seal all seams on drop-down plenums and wrapper panels to prevent grease leakage.
Don't underestimate the importance of leveling tools . An unlevel hood creates grease pooling and filter binding issues. We use both a quality 4-foot level and laser level for large installations. The hood must drain toward grease collection points with about a 1/4-inch slope per foot.
Grease duct construction using 16-gauge steel isn't just a code requirement—it's a safety necessity. Lighter materials simply don't provide adequate fire resistance. All ductwork must be continuously welded and liquid-tight unless you're using listed factory-built grease duct systems.
When space is tight, zero-clearance insulation can be a lifesaver. This allows installation against combustible walls, but only with specific insulation assemblies that carry ETL listing. The insulation must cover all surfaces within the clearance reduction zone and maintain its integrity throughout the hood's service life.
More info about our step-by-step commercial kitchen hood installation process provides detailed guidance for Central Virginia restaurants.

How to Install a Commercial Kitchen Exhaust Hood Frame & Hang Points
Getting the frame and hang points right is absolutely critical. I always start by marking ceiling locations using the hood's mounting dimensions and a plumb-bob for accuracy. We transfer measurements from the cooking equipment centerline to ensure proper alignment. Double-check everything before drilling—trust me, mistakes here are expensive and embarrassing to fix.
Drilling 9/16-inch holes in structural members requires the right technique. Use a high-quality drill bit and cutting oil to prevent binding. The holes need to be perfectly plumb and properly sized. Oversized holes reduce connection strength, while undersized holes can crack the structural member.
Installing 1/2-inch all-thread seems straightforward, but there's a technique to it. Thread nuts finger-tight initially, then adjust for final hood positioning. Always leave about 1/4-inch of exposed thread below the lower nut for proper engagement. This gives you adjustment room during final positioning.
Torque specifications matter more than most people realize. We torque hanging rod nuts to 57 ft-lbs using a calibrated torque wrench. This provides adequate clamping force without over-stressing the components. Under-torqued connections can loosen over time, while over-torqued ones can strip threads or crack components.
How to Install a Commercial Kitchen Exhaust Hood Duct & Fans
The exhaust riser installation connects your hood to the roof-mounted equipment. Size these risers for 500-2,200 FPM velocity and provide adequate structural support. Every joint gets continuous welds, and you must maintain proper slope for grease drainage back to the hood.
Supply plenum mounting requires careful alignment with your make-up air distribution system. Install plenums level and secure them properly to prevent vibration. Seal all connections to prevent air leakage that reduces system efficiency and wastes energy.
Roof curb welding creates the weatherproof connection between your ductwork and roof-mounted equipment. Use full-penetration welds and proper flashing to prevent water infiltration. Apply roofing sealant around all penetrations—water damage from poor sealing can be devastating.
Weld seam inspection ensures both code compliance and system integrity. All grease duct welds must be continuous and liquid-tight. We use dye penetrant testing on critical joints to verify weld quality. It's extra work, but it prevents problems later.
Fan rotation testing confirms proper airflow direction before system startup. Incorrect rotation reduces capacity by up to 50% and can damage equipment. Most fans include rotation arrows—always verify actual rotation matches these indicators before calling the job complete.
Wiring, Controls & Fire Suppression Integration
The electrical work requires special attention in commercial kitchens. High-temperature wire rated for at least 90°C (194°F) prevents insulation breakdown and fire hazards. Route all wiring through hard or flexible conduit, and never allow conduit to contact the hood ceiling directly—the heat will damage the insulation.
Shunt trip integration automatically shuts down cooking equipment during fire suppression activation. Wire all equipment under the suppression system coverage area to shut down on discharge. This prevents re-ignition and allows suppression agents to work effectively.
Lighting installation provides adequate illumination for cooking operations. Use fixtures rated for grease-laden environments and high temperatures. LED fixtures offer excellent energy efficiency and long service life in these demanding conditions.
UL 300 system integration requires careful coordination between hood, suppression, and cooking equipment. The suppression system coverage pattern defines shutdown zones—all equipment within this pattern must shut down during activation. Follow manufacturer wiring diagrams exactly; there's no room for creativity here.
Automatic gas shutoff prevents fuel from feeding fires during suppression activation. Install gas solenoid valves in the supply line to each gas appliance. Wire these valves to close immediately when the suppression system activates, cutting off fuel supply to prevent re-ignition.

Test, Inspect & Maintain Like a Pro
Capture smoke testing verifies that your hood effectively contains cooking emissions. Generate smoke around the entire perimeter of cooking equipment with all appliances at operating temperature. The hood should capture 100% of visible smoke without spillage into the kitchen.
Initial startup procedures ensure all systems function properly before putting the kitchen into service. Test fan rotation, verify airflow rates, and confirm all controls operate correctly. Check make-up air balance and adjust as needed to maintain proper room pressure.
Static pressure readings indicate system performance and identify potential problems. Measure static pressure across filters, at fan inlets, and at key ductwork points. High readings suggest restricted airflow or dirty filters that need attention.
Maintenance logging documents system performance and ensures warranty compliance. Record filter cleaning dates, inspection results, and any corrective actions taken. This documentation proves proper maintenance if warranty claims arise.
Quarterly filter cleaning maintains system efficiency and prevents grease buildup. Remove filters and soak in commercial degreasing solution, scrub thoroughly, and rinse completely. Never use corrosive agents like chlorine or acids on stainless steel surfaces.
AHJ final sign-off completes the installation process and allows kitchen operation. Schedule this inspection after all testing is complete and documentation is prepared. The inspector will verify code compliance and system performance before issuing occupancy permits.
Scientific research on grease management provides detailed guidance on maintaining commercial kitchen exhaust systems for optimal performance and safety.
More info about our range hood repair services includes ongoing maintenance support to keep your system operating efficiently.

Frequently Asked Questions about Commercial Hood Installation
After helping dozens of Central Virginia restaurants steer how to install a commercial kitchen exhaust hood , I've noticed the same questions come up repeatedly. Let me address the big three that keep restaurant owners awake at night.
Do I need to shut off the exhaust fan during fire-suppression discharge?
This question sparks heated debates in contractor break rooms across the country. NFPA 17 suggests shutting down air movers to keep dry chemical agents from blowing around, but here's where it gets tricky— hood manufacturers often require exhaust fans to keep running during suppression discharge.
Why the contradiction? Running exhaust fans help vent dangerous fumes and pull suppression chemicals into the ductwork where they can knock down fires more effectively. But some fire marshals worry about backdraft risks, especially if make-up air shuts down while exhaust keeps running.
The real answer depends on your specific equipment and local fire marshal . I've seen installations where everything shuts down except hood exhaust, and others where only cooking equipment stops while ventilation continues. Some jurisdictions are strict about following NFPA 17 to the letter, while others accept manufacturer recommendations.
Always follow your fire suppression manufacturer's wiring diagram for shunt trips—they've done the engineering to make their system work properly. More importantly, engage your local fire marshal early in the planning process. Getting their approval upfront prevents expensive rewiring later and protects you from liability issues.
What clearances apply if my hood has factory insulation?
Here's where many contractors get burned (pun intended). Factory insulation can reduce clearance requirements to zero inches , but only when it's properly certified and installed. Just because your hood came with insulation doesn't automatically mean you can mount it against combustible walls.
ETL-listed insulation assemblies allow direct mounting to combustible surfaces, but the devil's in the details. The insulation must be minimum one-inch thick and cover all surfaces within the clearance reduction zone. Every square inch matters—miss a spot and you're back to standard 18-inch clearances.
Installation must follow the ETL listing exactly. I've seen inspectors reject installations because contractors used the wrong fasteners or left small gaps in insulation coverage. Document everything with photos during installation—inspectors appreciate thorough documentation and it protects you if questions arise later.
Don't assume factory insulation automatically reduces clearances without verifying the specific ETL listing and local code acceptance. When in doubt, maintain standard clearances rather than risk a failed inspection.
Who signs off on the final installation?
This is where restaurant owners often get surprised by the complexity. Multiple authorities typically review commercial hood installations , and each has different requirements and schedules.
The local building department handles structural and mechanical code compliance. They verify your hood mounting, ductwork installation, and electrical connections meet building codes. Their inspector focuses on safety and structural integrity.
The fire marshal reviews fire suppression systems and emergency shutdown sequences. They test suppression activation, verify gas shutoffs work properly, and confirm all equipment under suppression coverage shuts down correctly. Fire marshals take their time—rushing them never helps.
Some jurisdictions require health department approval for food service operations. They may inspect hood performance, grease management systems, and overall kitchen ventilation effectiveness. Health inspectors often have the final say on whether you can serve food.
Start the approval process early by submitting plans and coordinating inspection schedules with all relevant authorities. Each agency may require different documentation and have conflicting availability. Missing any required approval delays your opening and costs serious money in lost revenue.
Professional installation teams familiar with local requirements make this process much smoother. At VA Commercial Repair Solutions, we work with authorities throughout Central Virginia regularly and understand their specific expectations. We know which inspectors prefer detailed documentation, who focuses on particular code sections, and how to schedule inspections efficiently to keep your project on track.
Conclusion
When you're staring at that empty kitchen space, wondering how to install a commercial kitchen exhaust hood , this isn't just about moving air—it's about protecting your entire business investment. We've walked through every step together, from those first permit applications to that final inspection sign-off, and there's one thing I want you to take away from all this: this is serious business that demands serious expertise .
The numbers don't lie. That $4,000-$5,000 per linear foot investment might make your accountant wince, but it's protecting something far more valuable—your restaurant's future. I've seen too many kitchen owners try to cut corners, only to face health department shutdowns, insurance claims, and worse . The grease-laden vapors we're dealing with aren't just unpleasant; they're dangerous.
Performance and longevity aren't just nice-to-haves in commercial kitchens—they're survival essentials. A properly installed hood system will quietly do its job for decades, keeping your kitchen comfortable and your staff happy. But a botched installation? That's a nightmare that keeps giving, with constant breakdowns, code violations, and safety hazards that can put you out of business.
Here's what I've learned after years of helping Central Virginia restaurants get their ventilation right: the installation is only as good as the team behind it . Those NFPA 96 requirements aren't suggestions, and local authorities don't accept "close enough." Every weld, every clearance, every control wire matters.
At VA Commercial Repair Solutions , we've guided restaurants from Charlottesville's busy downtown to Harrisonburg's college district through successful hood installations. When you call us, you're not getting voicemail—you're getting a live person who understands that your kitchen downtime costs real money. We know the local inspectors, we understand the permit process, and we've solved the tricky installation challenges that make other contractors scratch their heads.
Whether you're opening that dream restaurant in Staunton, expanding your successful spot in Waynesboro, or upgrading an older kitchen in Lexington, we're here for the long haul . Our repair-first philosophy means we're not trying to sell you the most expensive system—we're focused on what actually works for your specific situation.
More info about our comprehensive commercial kitchen hood solutions covers everything from initial installation to that 2 AM emergency call when something goes wrong.
The bottom line? How to install a commercial kitchen exhaust hood isn't a weekend project or a favor for your handy nephew. It's specialized work that requires professional expertise, proper tools, and deep knowledge of safety codes. Get it right the first time, and your kitchen will serve you reliably for years to come. Get it wrong, and you'll be dealing with problems that could have been easily avoided.
Your restaurant's success depends on many things, but safe, efficient kitchen ventilation isn't optional—it's the foundation everything else is built on.